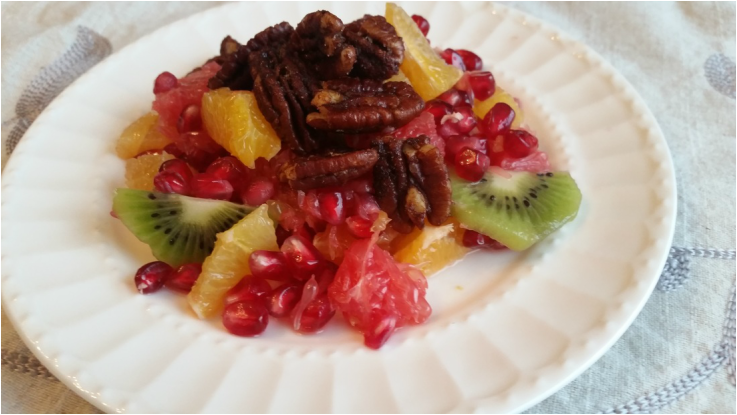
 For a Thanksgiving dessert this year, I decided to bring a fruit salad, inspired mainly by the pomegranate that is becoming available in the grocery stores right now. Coupled with some Florida citrus and kiwi, the colors and flavors combine to make a tart yet sweet, jewel-y treat. Additionally, I've been craving gingerbread so I made a batch of gingerbread-inspired pecans to top the fruit salad. A few words about pomegranate: I tried this fruit for the first time while living in Turkey, where it is quite ubiquitous. It is available in markets, juiced for drinking, added to desserts, and used to make a type of sour sauce that is sometimes used in the way that one might use vinegar. My neighbor showed me how to open one and pull out the seeds, and I grew to love this delicious tart fruit. The seeds are beautiful - they look like rubies - and delicious - they pop with juice when you bite into them. I eat them by the spoonful, or mixed with plain yogurt. I still make a holy mess when I cut into one and pull the seeds out, but it's well worth it. Toasted Gingerbread Pecans 2 cups pecans 1 Tbsp sugar 2 tsp cinnamon 1/2 tsp nutmeg 1/2 tsp powdered ginger 2 Tbsp olive oil 1 Tbsp maple syrup Toss all ingredients in a large bowl. Once well combined, dump onto a cookie sheet lined with parchment. Bake at 400 degrees, stirring every 10 minutes twice for the first 20 minutes, and then every 5 minutes after. For the fruit salad, I combined several cups of peeled and sliced oranges, red and white grapefruit, kiwi, and the seeds from two pomegranates. Top the fruit salad with the nuts right before serving. 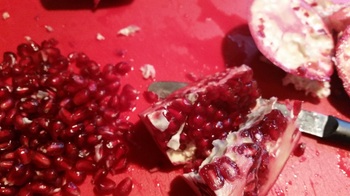
0 Comments
 Today was supposed to be spent doing a 12-mile loop hike in the mountains, tagging two more 4,000 footers. But it rained. And yes, we could have gone in the rain. But it's so much more fun on a nice day. So it turned into a (much needed) day at home. Having just finished my first week at a new job, I needed some down time.
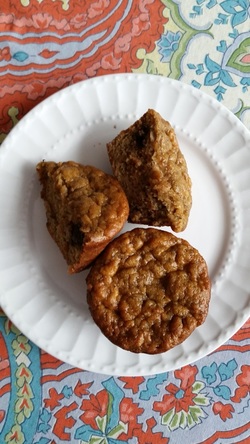
In the midst of working through a large sorting/cleaning/moving project, I decided to make some banana muffins. What I really wanted was banana bread, but even the GF flours bother me sometimes, so I decided to go with a grain free recipe. This is one that I've made once before, but I tweaked it a bit and it came out much better. The coolest thing about this recipe is that it has NO FLOUR. None. Not coconut. Not almond meal. Not rice flour. So I don't have to worry about the nut issue (son is allergic to tree nuts) or the "funny taste" of coconut that both kids complain about. This is a 6-ingredient recipe, and you won't believe it unless you try it. I throw my browning bananas into the freezer and save them for smoothies or baking. Today I happened to have 3. They thaw very quickly if you put them in a bowl of water...it took about 15 minutes this morning. I used peanut butter (not paleo, strictly) because we have a kid with tree nut allergies, but I'd love to try this with cashew or almond butter. And I used maple syrup that my older son made this spring when he and a friend tapped some trees on the property and boiled it down. Ingredients 1 cup nut butter 1 1/2 cups mashed bananas 1 tsp baking soda 1 tsp vanilla 3 eggs, beaten 1/3 cup maple syrup or honey 1 cup chocolate chips (optional) 1. Combine all ingredients in a mixing bowl. Stir until well combined. 2. Grease 12 muffin tins, and fill 3/4 full with batter. 3. Bake at 350 degrees for 20 minutes. The muffins will need to sit and cool for about 15 minutes until you attempt to eat them. They are initially quite soft, but will become a consistency such that you can pick it up and eat it just like a regular muffin. If you can't wait that long, I recommend a plate and a fork (from personal experience...). 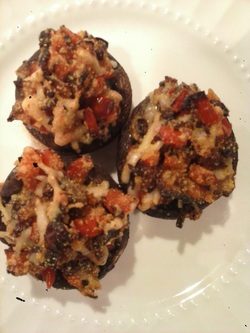 I love stuffed mushrooms, but because of gluten/grain content in most commercial varieties, I don't eat them anymore. Tonight I was craving them, so I created this recipe for myself. I ate it as an entree, but it would also make a great app for any occasion.
Several tablespoons olive oil or butter (I used a mix of both) 12 Mushrooms (I used baby portobellas) 1/2 onion, chopped 1/2 cup chopped red pepper 2 cloves garlic, minced 1/2 tsp salt 1/4 cup grated parmesan (optional ifyou are dairy-free) 2 Tbsp corn meal OR tapioca starch 1. Preheat oven to 425. Cut the stem out of the mushrooms, slightly hollowing out the cap. Chop the stems and set aside. 2. Place hollow caps on a cookie sheet. 3. Heat oil over medium heat. Add onions and cook for 5 minutes, until soft. 4. Add red pepper, chopped mushroom stems, garlic, and salt and cook for 5 more minutes. until all vegetables are soft.. 5. Put cooked veggies in a bowl. Add parmesan and corn meal or tapioca starch. Mix well to combine. 6. Spoon mixture into mushroom caps. Bake at 425 degrees for 15-20 minutes, until lightly browned.  I am so thankful to one of my husband's cousins for introducing me to this recipe. She made and served these one evening when we were at her house, and they have become a weekly staple at ours. These take an hour - a full hour - to be perfect, so plan ahead. I like to get them ready right when I walk in the door from work and start them baking. Sometimes they are a side dish, others they are the main dish. One son has topped them with chili and cheese, for instance. Sometimes I'll just have these for dinner and not much else.
This is a simple, low-maintenance recipe. The fries are crunchy enough that you can pick them up and dip them into ketchup. They brown up because you add a little bit of sugar when you are preparing them. They scratch the itch for fries, without needing a deep fryer or using oils heated to high temperatures. They don't require stirring or any other type of maintenance - once you put them in the oven, it's just a matter of waiting an hour until they're done. Ingredients 4 Russet potatoes, cut into fries. I like them to be about 1/2 inch thick. 4 Tbsp olive oil 1 tsp salt 2 tsp sugar Preheat oven to 400 degrees. Cut potatoes, and place them into a large bowl. Add remaining ingredients and toss until potatoes are coated. Spread evenly on a baking sheet. Put in oven for 1 hour. Don't stir or disturb in any other way. After 1 hour, remove from oven and allow them to cool for 5 minutes. Serve. *I recommend putting the potatoes on parchment paper on the cookie sheet. Don't make the mistake I made once of putting them on wax paper...you can imagine. Brilliant. * 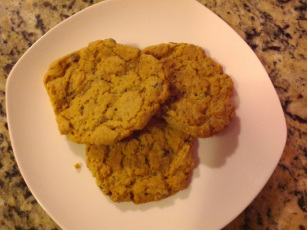 Not much to say about this recipe, besides that it is simple (5 ingredients), delicious, a crowd-pleaser (just don't tell people they're gluten-free), and highly adaptable. The original recipe - and the one I usually make - calls for peanut butter. I found it on the Whole Foods site a few years back while searching online for a GF peanut butter cookie recipe. Try it with any form of nut butter and see what happens. Add chocolate chips, or don't. Throw in some oats or some chia seeds. The nutritional information for these cookies will rival any granola bar or protein bar that you might buy at the grocery store, but you get to have control over the quality of the ingredients. These are great for dessert, or thrown into lunches, or stashed in a backpack to eat during a long hike. These are not crumbly or saliva-sucking like some GF baked goods can be.
Ingredients: 1 cup nut butter (use a "natural", lower sugar form if possible) 3/4 cup sugar (or equivalent baking sweetener of your choice) 1 egg 1 tsp vanilla (this is actually optional) 1 tsp baking soda Variations: -Add chocolate chips -Use almond butter and add white chocolate chunks and dried cranberries or blueberries -Add oats, seeds, or chopped nuts Combine ingredients. Drop by spoonfuls onto cookie sheet. No need to flatten. Bake at 350 degrees for 8-10 minutes. They will still look a little underdone at this point, but take them out anyway and let them cool. If you overbake them, they get dry and crumbly. 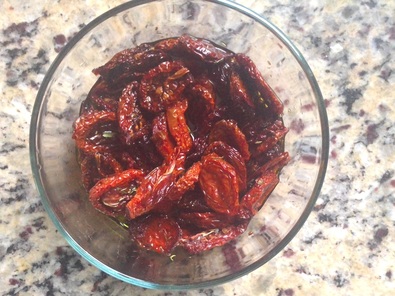 I have way more tomatoes coming out of my garden than I can deal with right now. In years past, I would rinse them, cut off the stems, put a few cups into storage bags, and store in the chest freezer in the basement. This is a great way to store tomatoes if you have the freezer space. They can be thawed and used to make soups and sauces throughout the year. This year, however, being in the throes of a home sale/purchase, and facing an impending move, I had already defrosted and cleaned out the freezer, so that wasn't an option. Also, I am not motivated to process and can tomatoes right now, what with the start of a new school year and the above-mentioned move. I have shared some at work, but I am picking more and more every day - more than we can possibly consume. It occurred to me the other day that sundried tomatoes are delicious, take up small amounts of space, can be stored for long periods of time, and are probably pretty easy to make. The photo to the left shows my finished product. 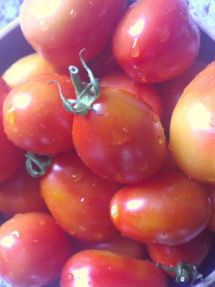 I started with a lot of freshly-picked Roma tomatoes. I cut them in half and placed them on a cookie sheet, insides facing up as below. I then put them in a 250 degree oven for about 4 hours. I turned the oven off and let them sit overnight. In the morning, they looked like the tomatoes in the photo below. They weren't quite dried enough, so I put them out on the deck before I left for work in the morning. (It was a hot, sunny day.) When I got home 10 hours later, they were drier, but still not completely dehydrated. I put them back into a 250 degree oven for another hour that evening, and they were perfect. This process obviously involved a lot of trial and error. I think when I do this again, I will leave them in the oven for 6-7 hours at 250 degrees and that should finish them nicely. If I were home during the day, and if the weather were right, it would be fun to try drying them in the sun only, but it seems that it would take longer, maybe even several days. Once finished, I placed them in a glass container and mixed them with some olive oil, basil, a pinch of salt, and bouquet garni. They can be stored in the fridge this way for several months. Alternatively, you can leave them dry and store in a sealed bag at room temperature. 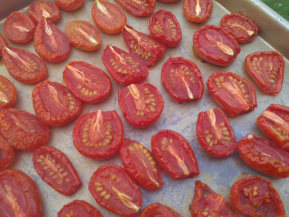
I love potato chips. Especially Utz Kettle Cooked potato chips. Especially a handful after a long day at work, when I'm actually hungry for dinner. And there is a place for them, in moderation. However, my idea of moderation tends to...ummm...mushroom over time, so that instead of a few a day, I'm having a few handfuls a day. Something my manatee-like metabolism just can't handle.
I also love Schezuan green beans. Like really love them. Can eat them like...Utz potato chips. So I got to thinking, why not just cook a batch of those after school, when it's too early to eat dinner, but when I want to have a bit of a snack that won't kill my appetite. A snack that is veggie-rich, but also satisfyingly savory and fatty. Like a potato chip, but better. And so this recipe was born. Ingredients Several tablespoons of olive oil 1 pound of fresh green beans, ends trimmed off 2 cloves minced garlic 1 Tbsp grated ginger 1 Tbsp tamari Water 1. Pour oil into a large skillet. Heat over medium temperature. 2. Wash and trim green beans. Pat dry. Add to hot oil. Stir fry for 5 minutes. 3. Add garlic and ginger. Stir fry for 10 minutes more. 4. Add tamari. Stir fry for 5 minutes. 5. Add a few tablespoons water to deglaze the skillet. Add more water, and allow to simmer gently for another 5 minutes. The green beans should be a little crinkly from the higher-heat frying, and have some nice crispy brown bits. Serve on a plate. Eat with your fingers, like fries. I have noticed one thing to be true of my boys: they are always starving (their term) after a day of school. Over the past 2 years, I have tried to figure out something that they could eat in the afternoon that would be satisfying and healthy, made only from whole foods (a.k.a. things that don't need a list of ingredients to explain what they are), and not spoil dinner. Eventually the concept of the "rainbow" evolved. I have found that if I cut up fruits and veggies, include a hunk of cheese or a dish of yogurt, and sometimes some nuts, they will snack happily all afternoon. It's a crunchy, portable snack - it can easily be eaten while reading a book or building Legos - and it's boosting their veggie and fruit intake for the day. I try to give them a variety of colors and textures. They often don't ask for anything else to eat after they've finished it and it easily holds them over until dinner time.
I have found any combination of raw fruits and veggies works, though there are limitations because of their relatively picky palates. They will pretty much eat all of the following: cucumbers, carrots, red peppers, bananas, apples, oranges, grapes, blueberries, strawberries, and sometimes grape tomatoes. I use only organic produce for the rainbow. It tastes better, and I don't have to worry about pesticide intake for the day! Looking for whole-foods-based, home-prepared, nutrient-rich snack ideas? Look no further.
Snacking, at the holidays or any other time of the year, can be challenging when you start looking at them through the lens of grain-free, gluten-free, non-sugary choices. Of course, there is always room for an indulgence or two, but it's also nice to have some tasty alternatives to veggie platters and cheese plates. These are some of my favorites: Kale Chips: 1 bunch kale (6-8 stalks) 2 Tbsp balsamic vinegar 2 Tbsp olive oil Sea salt Wash and pat dry the kale. Tear the leaves into bite size pieces, leaving the center stem and put in a bowl. Stir in the vinegar, oil, and salt until the leaves are coated. Spread on a cookie sheet in a single layer - I use parchment, but a greased pan works as well. Bake at 350 degrees for 20 minutes or until leaves look crisp and slightly browned. Let cool and serve. Tamari Roasted Almonds 1 pound raw almonds 3 Tbsp tamari 1 Tbsp olive oil Put nuts on a cookie sheet. Stir with tamari and olive oil. Sprinkle with cajun seasoning. Bake at 350 degrees for 20 minutes, stirring every 10 minutes. Let cool and serve. Cheese Chips Line a cookie sheet with parchment paper. Grate 2 cups of cheddar cheese. Sprinkle thinly over parchment paper. Bake at 350 degrees for 15-20 minutes, or until cheese is bubbly and slightly brown. Remove from oven and let cool. Break into bite-sized pieces and serve. We are setting off on a 2-week road trip to visit family and friends from New Hampshire to Michigan. Super exciting, but there will be a LOT of driving involved. And when there's lots of driving, that means there's lots of fast food and inactivity. Yuck. Bad combination.
Being gluten free, and trying to avoid processed food-type items in general (including, but not limited to, crackers, cookies, Goldfish, and granola bars) can make packing road-trip-friendly snacks challenging. I have a few ideas that I thought I would share here. I have found that a cooler is key to having ample healthy snacks on hand. We end up taking one nearly everywhere we go. Dry Goods: Nuts - everyone's favorite variety, packed into Ziploc bags or jars. Beef jerky - homemade OR a brand that does not contain MSG, nitrates, or nitrites (Trader Joe's) Rice snaps - like crackers, but made only from rice and water. Great vehicle for cheese or nut butters. Nut butter - Even though peanuts aren't strictly primal, we still eat some peanut butter. Almond butter is a nice alternative. Don't forget knives/spreading implements. Cooler Items: Yogurt - all forms - plain for me, fruity for kids - smoothies, tubes, cups. Cheese, cut into slices Fresh fruit, washed and ready to eat Baby carrots, cucumber slices, cherry tomatoes, washed and ready to eat. Seltzer water Milk boxes Dark chocolate bar A family could easily spend a day eating these foods and get the nutrition they need, and feel satisfied. That's not to say that we won't get the boys burgers and fries somewhere on the trip, but having healthy options in the car cuts way down on the likelihood that we make a junk food purchase out of desperation or convenience. It allows me to choose the organic/natural items I prefer and have them available no matter where we go. It takes a little bit of planning and packing, but pays off through the course of the trip. |
AuthorI'm Emily. I currently work in online education management, but I also have a Masters degree in Nutritional Sciences (my true passion). In addition, I am a mom, cook, avid reader, novice gardener, and enjoy all kinds of outdoor activities. On my blog, you will find articles on food, fitness, weight management, and eating issues. ALL recipes on my blog are gluten-free. Many are low-carbohydrate. Most are grain free. Enjoy! 
Categories
All
Archives
June 2019
|
